Landing Page Canvas
The Landing Page Canvas is useful when you have decided to run an online experiment that you need a Landing Page for.
Use this tool when:
Overview
| Time | ± 60 minutes | |
| Difficulty | 4 / 5 | |
| People | 3 - 5 | |
| Author | erik van der pluijm | |
| Website | ||
| License | CC BY SA 4.0 |
What is it and when should I use it?
In your startup journey, there is a lot of uncertainty. Is your idea good enough? Do people really like your proposition? Can you reach the right customer segment? These are but a few of all the questions you’ll run across.
The Landing Page Canvas is useful when you have decided to run an online experiment that you need a Landing Page for. Typical examples are a ‘smoke test’ experiment, where you want to see if a certain value proposition gets any attention from potential customers, or a pricing experiment, where you want to validate different prices with potential customers.
Tip! More types of experiments you can run can be found in the Experiment Cheatsheet.
Example This article contains a number of insights to get you going when you’re starting out with your first experiments.
Before you start designing a Landing Page, it makes sense to have a look at your risky assumptions with the Riskiest Assumption Canvas and to define an Experiment Canvas, so that you’re completely clear on what you want to test.
Tip! The steps below will help you set up your landing page, but to successfully launch and run the experiment you might need a bit more. A detailed writeup of how to run a landing page experiment, how to collect the results, and how to interpret them can be found in this article.
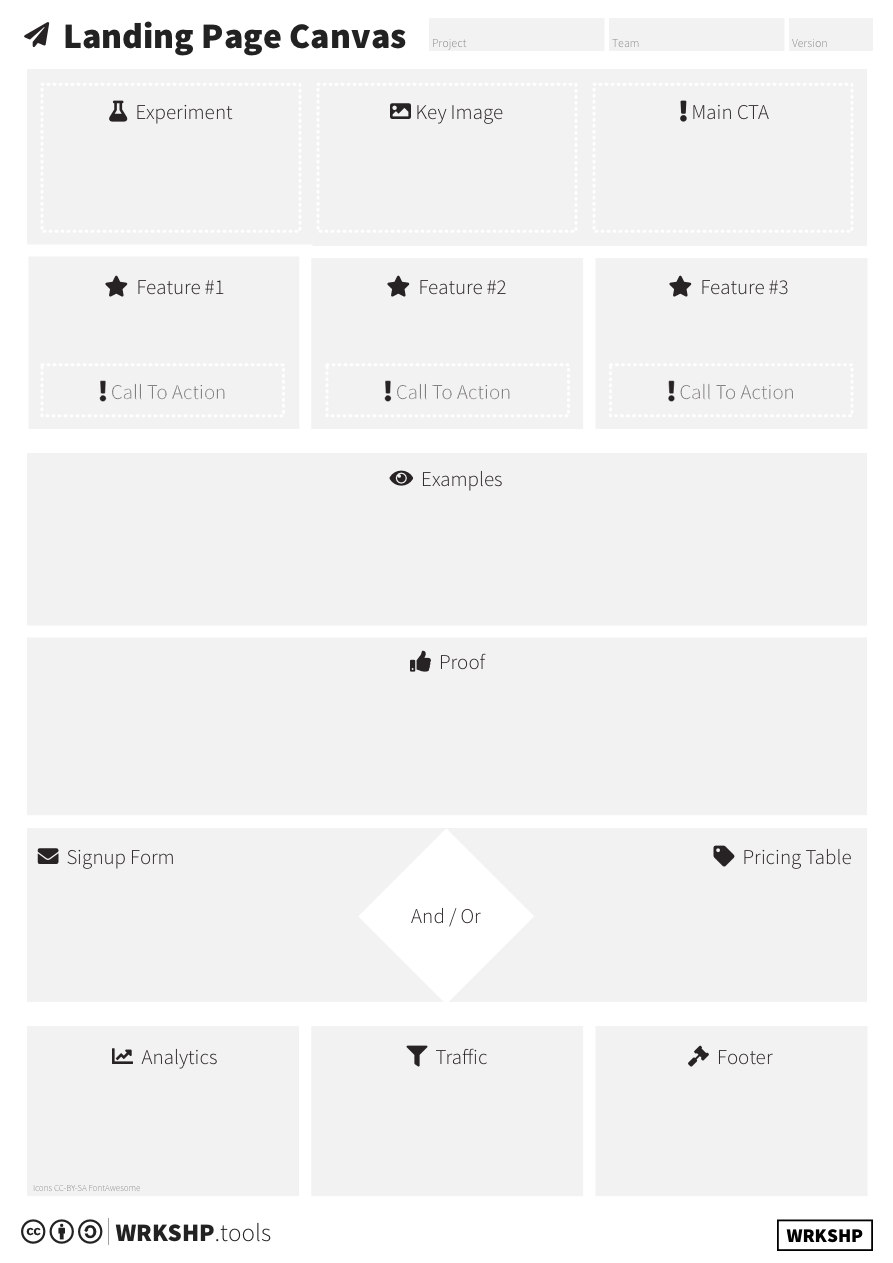
Tool Overview

Experiment What hypothesis do you want to test with this landing page? And how will you know it’s a success?
Key Image Add an interesting and descriptive image for your experimental value proposition.
Main CTA What do you want people to do after they see this landing page?
Features What features do you expect people to respond to the most?
Examples What examples do you have to explain to people what you’re offering?
Proof What proof do you have for what you claim to do? Do you have testimonials?
Signup Form What is on your signup form? Where do the signups go?
Pricing Table What different pricing levels do you offer? What features are linked to them?
Analytics What are you going to measure? And how will you measure it?
Traffic How will people find your landing page? How will you direct traffic towards it?
Footer What is going to be in the footer? Do you need contact details? Disclaimers? Legal information?
Steps
1 Prepare
Before you start, make sure of the following:
- You have defined a Riskiest Assumption Canvas and/or Experiment Canvas that defines what you want to achieve with your landing page.
- Using the information from these canvases you can also estimate the cost for your experiment using the Experiment Cost Calculator.
- You have (or know how to get) access to a large enough number of people that will interact with your landing page. Do you have for instance people on an email list that you can reach? Or existing customers? Or will you have to be creative to get people to see your new page?
- You have access to hosting or a landing page tool such as e.g. Squarespace (see below for all the options)
- You have defined your Value Proposition for this experiment, e.g. with the Value Proposition Canvas.
- You have defined a Riskiest Assumption Canvas and/or Experiment Canvas
In your war room, stick the big printout on the wall or draw the canvas on a big sheet of flip over paper. Set aside 30-45 minutes with your team.
Stick the key items from the Experiment Canvas in the top left corner. Copy the hypothesis and the riskiest assumption.
Warning! This is an experiment! It's not about your 'final product'. Remind yourself of the hypothesis you're testing while defining the Landing Page. If you don't do that, you risk drifting towards making a page about your 'final product' instead of one that really tests your hypothesis.
Remember that you'll be able to change the page at any time. Things that help you prove or disprove the hypothesis take center stage, everything else should be omitted if possible.
2 Key Image and Call to Action
Go back to your Value Proposition and extract the key items for your value proposition. This is the hardest part of the canvas, so don’t be afraid to iterate on this.
Tip! Based on what you already did, start with your ‘best guess’ and come back to it when you are a bit further along in the canvas. You’ll probably get more or clearer ideas while doing that.
Once you have defined the key elements, try to come up with ideas for images that you could use to show this value proposition to people that have never heard of it. Take some inspiration from other landing pages.
Tip! Take some inspiration from other landing pages. Google ‘best landing pages’ or click here for examples curated by Hubspot.
When you have an idea for a top image, start thinking of your main call to action. Refer back to your Experiment Canvas, and see what kind of output you need to validate or invalidate your experiment. This should inform your main Call to Action (CTA). Come up with a text for your call to action as well as a reason for people to signup.
Example If you have defined an experiment that requires users to signup to an email list as a key metric to validate interest in a product, then your call to action should trigger people to signup. An example of a CTA would be ‘sign up now!’. The ‘reason’ for people to sign up is your hypothesis of why they would sign up. It could be: “I want to know more about this product and stay up to date!” or “I want to be the first to know about it when this product becomes available”. Or even: “I want to sign up so I can get a discount.”
Tip! Use the Eisenhower Matrix or the Customer Need Canvas to explore the reasons why your customers might be interested in the Call to Action.
3 Key Features
Now that you have created your main image and CTA, spend some time to come up with 3 features that really showcase your product to users. What are the most interesting features? What have they already told you? What features do you need to test for your experiment?
The ‘Product’ here is just what you want to show as an experiment. It does not need to reflect your final product; it could for instance be a particular mix of features you want to test.
For each feature, come up with a variation on the call to action.
Tip! Once you have a few people signed up or in your network, ask them about the features they like the best. Come up with 5-10 possibilities and have them pick the 3 most interesting ones.
4 Examples and Proof
A lot of people love seeing concrete examples of a product or service before they sign up or buy anything. Come up with the most important things people want to know about.
Tip! Once you have a few people signed up or in your network, ask them about the examples they want to see. Come up with 5-10 possibilities and have them pick the 3 most interesting ones.
The next step most people take, once they are interested, is to look for proof. Examples are one kind of proof, that show how something works. But social proof is just as important. Testimonials and ratings show people that others also like your product. Sometimes, when your product or service is very fresh, you may need to be ‘creative’ to get some good ratings here. Make use of any customer interviews you have done already. Our tip is to stay away from making things up.
5 Sign up and/or Pricing
The last step of getting together page content is to decide on a signup form, or e.g. a pricing table. Again, this depends on your experiment. This is where your CTA’s point to, and so this is the spot where you will be very convincing. What do you want to test?
Tip! Test what you did with colleagues. Come up with a few alternatives and find out which ones are resonating the most. Can you come up with alternative texts? Different formats?
6 Final Details
The bottom of the canvas has three sections that are sometimes forgotten. These should not be just an afterthought! First of all, as you’re running an experiment, how are you going to measure your progress? How and what are you measuring things?
Example If you’re going to use Google Analytics to track page visits, this is where you specify the different pages you want to measure. Are you going to use specific UTM tags to differentiate between paths users took on the site? Are you going to track extra things such as hidden fields?
Traffic is just as important. Just throwing your page online and not thinking about how users will find it will make your experiment fail. You need to think about how people will end up on your page. Do you have access to audiences you can engage, such as existing email lists or newsletters, or existing facebook groups? Or will you need to build your audience from scratch?
Your footer is the last thing to do. Make sure you comply with any rules you should comply with and have the right disclaimers. If you’re running an experiment, make sure you explain that. And should people contact you? Can they find you on twitter? Make sure to collect the relevant links.

Example of a filled out landing page canvas for a juice delivery concept called “Jooz”
Steps: Making it real
A Building the Page
Now that you have your template filled out, it is time to build your page.
Before you do any design or implementation work, make a wireframe based on the information in the Landing Page Canvas. Simply make a neat version of the canvas, with the information filled in, and present it to a few test users. Do they understand it? Do they have any questions? If you find that you need to change something, do so. It’s still super cheap!
Now, use a landing page builder such as Squarespace, Mailchimp, Unbounce, or Launchrock. (See below for links) They have tons of standard templates you can use. If you already have some branding, you can use that as a base. Otherwise, try to find a template that matches the look and feel you’re after as well as possible. It’s (probably) not the point to test your branding (you might even do well to use a ‘fake brand’ to experiment with), so as long as it looks ‘plausible’ it’s fine. Choose the color palette that fits your vision and product idea for this experiment. And go crazy building the page!
- Great photos can be found on Unsplash
- Great free fonts can be found on Google Fonts
- Squarespace has good support for a lot of other things as well, make sure to look at their help files. You can use a standard URL so you don’t need to own a domain, which is perfect for experiments with throw-away test brands. Of course, a real domain name looks more impressive!
In your page builder of choice, make sure you implement the Analytics and Traffic boxes you filled. If you for instance test a pricing model by counting how many times people click specific pricing links, you will need to tag those links. Making them go to separate thank you pages is often the easiest way to do this. Now you can count the differences in Google Analytics. Finally, add your signup mail service (we prefer Mailchimp and Drip) and create the appropriate lists and standard reply mails that people get on signup.
B Before you launch
So you’re ready to launch your landing page! Awesome. Don’t click launch just yet. Test it with a small user group first. Are there any stupid things you missed? Does it look like their behaviour will validate or invalidate the experiment?
Test the flow of the page. Do people actually get signed up in the email list?
Also, how are you going to get people to your page? You will need to do something in order to get people to look at your page and express the behaviours you want to measure for your experiment. A good way to do this is to advertise on e.g. Facebook, or to send a mail to an existing mail list. Prepare your posts for that. And don’t forget to test those too :)
C Launch!
Once you did your final check, it’s time to hit launch! Good luck!
D Extra: Tweak
After launching, keep an eye on the analytics. Do you see what you expected? Do you get any feedback? Update the page if needed to remove any noise that is not helping you validate your experiment. Try to get in touch with some of the people that signed up and find out why they did so. You might get some super valuable and unexpected results!
Resources to get you started
- Examples for landing pages
- Landing Page Builders: Squarespace, Unbounce, Launchrock, Carrd
- Mailing list tools: Mailchimp, Drip
- Analytics: Google Analytics, Google Tagmanager, Hotjar
- Fonts and typography: Google Fonts, Unsplash photos
- Color palettes Coolors color palettes
- The Noun Project open source icons, or open source illustration via Undraw
- Or, better yet: find a designer on Dribbble or Behance. If you really want to keep it cheap: Fiverr.