Persona Canvas
The Persona Canvas gives you an easy to read visual of that can help you to understand your users or customers. What are their goals? What are they trying to achieve?
Use this tool when:
- you want to understand your customers or stakeholders or users
Overview
| Time | ± 45 minutes | |
| Difficulty | 3 / 5 | |
| People | 3 - 5 | |
| Author | erik van der pluijm | |
| Website | ||
| License | CC BY SA 4.0 |
What is it and when should I use it?
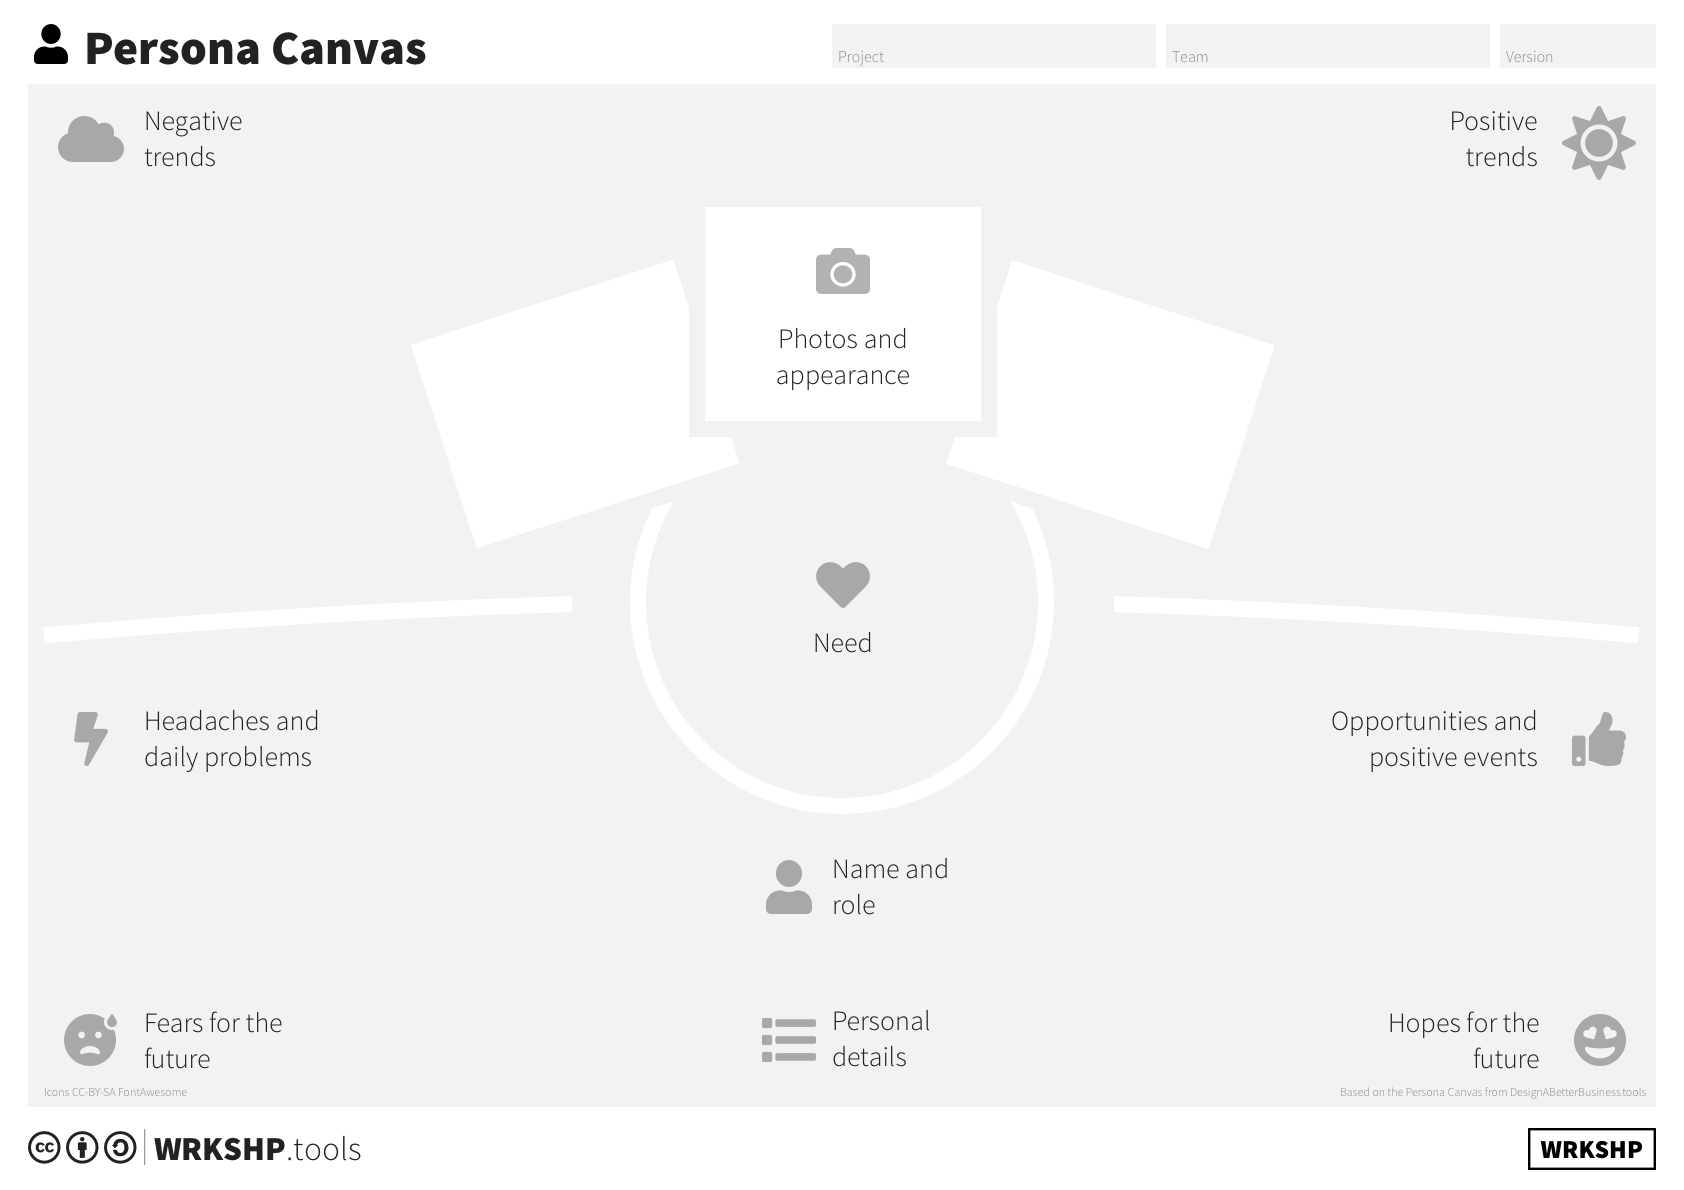
The Persona Canvas is organized in nine different sections. It is designed to be worked on as a team with postits and markers, and to give you an easy to read visual of your persona once you’re done.
The most important element in any persona is the representation of the person itself. The heart in the center defines the need your persona has. What is his or her goal? What is he or she trying to achieve? Completing the representation of the person, there is space on the bottom to add identifying information such as a name and a role, and any other facts you gather.
The next thing that stands out, is that the persona is divided into a left and a right side. The left side has space for negative aspects the persona has to deal with in their life, such as fears and trends with negative impacts. The right side has positive aspects. Using this left/right split, it becomes much easier to get a picture of what is going on in the life of your persona.
Tool Overview
Name, role, and personal details Giving your persona a real name and role helps anchor them in reality. Using a real person as a basis is even better.
Photos The canvas is designed to make it easy for you to add photographs of your persona. Is it a man? A woman? Is he or she happy? Or sad?
Need This is the goal the persona has, their job to be done. What do they really want? What decisions will they make?
Positive Trends What are positive trends the persona experiences in their life?
Opportunities and positive events What are positive opportunities the persona experiences in their professional or private life?
Hopes for the future What hopes does the persona have for the future?
Negative Trends What are negative trends the persona experiences in their life?
Headaches and daily problems What are headaches and roadblocks that the persona experiences in their life? What is blocking them from achieving their goal?
Fears for the future What fears does the persona have for the future?
Steps
1 Define your goal
Why are you creating a persona? What do you want to achieve? Are you trying to create a persona for design? For marketing and sales? For customer validation? Or for storytelling? Although the steps to follow are the same, knowing what to focus on will help you to ask the right questions and get a better result.
2 Gather Criteria
This step is critical. As we have seen, it is vital to base your personas on real data. On the other hand, gathering data can be very time consuming, especially if you don’t know very well what you’re looking for – which will most likely be the case if you’re just starting a new design journey. To be efficient, there is a balance to maintain. You will have to spend some time and energy researching, but at the same time, you can already start by coming up with what you think is relevant for the persona and make your assumptions explicit. Both your research and your assumptions will need to be validated, so on your first stab at the persona, it is fine to mix these up. The important thing to remember is, don’t try to create a perfect persona on your first attempt. Not only does such a perfect persona not exist, but spending too much time researching or coming up with stories isn’t going to get you there, even if it would. The real value is in validation. What research should you do on your first iteration?
3 Cluster the Data
In this step, you’ll filter your incoming research data and cluster it. An effective way to do this is in a workshop format. With your team, take 30-45 minutes to go over each of the pieces of information uncovered.
Try to see which pieces fit well together, and come up with 3-5 clusters. These are the nuclei for your personas. Each of the clusters should have a selection of demographics, sentiments, quotes, etc. Look for themes and characteristics that are specific, relevant, and universal to the cluster.
When you have done a first clustering, take a step back. Are your clusters distinct enough? Or are they all focusing on the same pieces of data? Do they make sense? Are the most interesting bits of research you have uncovered incorporated in the clusters? If you answer ’no’ to any of these questions, adjust your clusters.
4 Define your personas
The next step is to take your clusters and turn them into personas. To do that, stick a printout of the persona canvas above each of the clusters. Looking at the clustered data, fill out the canvas.
- Name and role: Start by choosing a name and role to go with your cluster, and defining other relevant demographic facts.
- Goals: Then, come up with a goal. What is your persona trying to achieve? What is the Job they are trying to get done? What is the problem they are trying to solve? What is the attitude they have towards this goal? Is it a pain? Or a nice to have?
- Trends: Next, go over the data you have uncovered and try to come up with positive and negative trends that impact the daily life of your persona. What are things that are happening in their world that are impacting them? It could be anything from the rise of AI or climate change to the rising popularity of K-pop. What is relevant totally depends on your project.
- Headaches, opportunities, hopes and fears: The next step is to fill out headaches and opportunities, and hopes and fears. Headaches are things that are blocking your persona from reaching their goal. What are they struggling with, in their daily life. Opportunities help your persona achieve their goal. Fears are things they hope will not happen in the future, and hopes are things they would like to happen in the future. People can be highly motivated by fears and hopes.
- Quotes: Finally, come up with quotes for each persona. What would be a typical thing for them to say? Use the sentiment analysis and online research as a base.
5 Create a Rich Picture
The next step is to create a ‘rich picture’ of your persona. The persona canvas is designed to do this. You should get a complete picture of who the persona is, just from looking at the canvas.
Create a complete picture: not only the facts and data points, but also the character of the person. What do they look like? What is their world like?
You can go overboard with this, but in the first iteration, it makes sense to go easy: after all, your work may come undone after validating it. You can either draw the person on the canvas, or stick photos, quotes, etc on it. Create a collage of the person, his or her environment, and what they hold important.
Once you’re done, spend some time to go over a day in the life of the persona. With your team, map out a few of the key moments during their day. See if you can add these moments to your canvas. If you don’t, the persona will remain a couple of datapoints, and nobody will get a ‘personal’ connection.
6 Mark your assumptions
Go over the persona you have created, and mark the things you have added to it that you have not validated or directly copied from data. These are your assumptions.
Then, add one extra assumption: that the 3-5 personas you have defined accurately cover your entire target audience. When validating, you’ll probably discover missing personas.
7 Validate your assumptions!
This is another crucial step. Luckily, it doesn’t have to take a lot of time and energy. Likely, you’ll be talking to (potential) customers anyway, so if you do that, mix in some questions about your persona.
Test if the goals, attitudes and preferences you have mapped out really exist. They won’t perfectly match, in most cases, and that is fine; but if you only get answers that are totally at odds with your persona, it’s back to the drawing board.
Another way to validate is to try and find a number of people from your target audience, and interview them face to face. Using your persona as a guide, come up with interview questions, and once you’re done, see if what you find matches your persona, or if it is totally at odds.
8 Next Steps: Iterate
Now that you have validated your persona, it’s time to find the problems and fix them. To do that, go back to step 1, and proceed from there. Of course, you probably won’t need to start from scratch this time, so there will be a lot less work to do. Rinse and repeat!
A persona is never completely ‘done’. Keep revisiting it throughout your design journey, and keep referring back to it.